
Note: This article has some plans and general construction methods, but we refer you to The Pavilion Book for information on all the things that you'll want to know when you make the tent.
These are the plans for one of the more popular pavilions in the Dragonwing line, a round pavilion 12' at the base, 10' at the ring, and 12' tall, with a roof pitch of 1:1. (It's a little taller than the commercial Dragonwing 12' round pavilion, to make the fabric waterproofing less critical.) It's a good size for two people, because you can put a double bed (four feet wide, seven feet long) in and still clear the center pole. We also have room for a card table and our usual garb and toys.

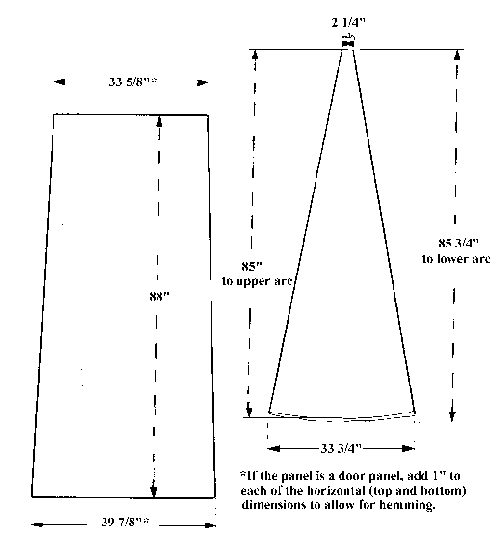
The panel height dimensions for the sidewall account for a two-inch hem allowance, folded twice to form a one-inch hem. The width dimensions reflect a seam allowance of 2 1/4" per panel - 3/4" on one side of the panel and 1 1/2" on the other (if this confuses you, go to John's article on pavilion-making and look at the picture of how the flat-fell seam is formed). I usually form two doors, in the front and the back, which means that your door panels have to be a little wider (an inch or so) to allow for a double-fold hem. Each sidewall half is composed of seven panels, to allow for a one-panel overlap against the elements for each door. (If you're just using a front door, you can eliminate one panel, and deduct 2 1/2 yards from the fabric estimates below.)
For fabric, you'll need 59 yards of 48" fabric (this includes 10% extra for miscuts, etc.). If you use 60' wide fabric, you'll need 46 yards (again including 10%); you'll also have to cut 10 full-panel sidewalls and cut 8 half-panels to piece together for the remaining sidewall panels. Remember to add 1 1/8" to each of the half-panel width dimensions to give you a seam allowance when sewing the half-panels together.
If your cloth is less than six ounces or so, also buy fifty yards of 1" webbing to sew into the hems of the side-wall and around (or into) the valance-canopy joining seam on the canopy. This will double the life of the tent ... seriously. And you can put grommets, etc. directly into the webbing without the need of reinforcement patches.
You'll need twelve roof panels. Again, the panel widths include a 2 1/4" allowance for a 3/4" flat fell seam. To draw the curve at the base, find a piece of non-stretchy string and form a loop at each end so that the loops are 85" apart. Put a push-pin through one loop and pin it to the apex. Put a pencil through the other loop and, pulling the string to eliminate slackness, draw your arc on the base of the canopy. Now draw another arc 3/4" below the first one, for a seam allowance, and cut the fabric on the outer-most arc. (If you have a lot of space at your disposal, you might prefer to cut the roof panels a little long and sew all the panels together first, leaving the last seam open. Then you can mark the arcs for all of the panels in one operation, eliminating potential error.)
The valance is sewn on as a single strip afterwards. Cut and pre-assemble it to be 15" wide and 390" long when completed. (If you're using 48" wide cloth, cut three strips each 132" long. If your cloth is 60" wide, cut four strips each 100" long.) That will be enough to go around the canopy, even if the tensions aren't exactly the same, and will leave enough to sew together at the ends. Hem the valance on one side. Sew the valance onto the canopy just before closing the last (twelfth) seam. You'll be using the same flat fell seam, with the valance on the bottom and providing the flap to be folded inward. When you've sewn the first line of the flat-fell seam completely, trim the excess valance to match the canopy. Then sew the second line of the seam (enclosing within the seam some more of that 1" webbing, if you're using a lighter fabric).
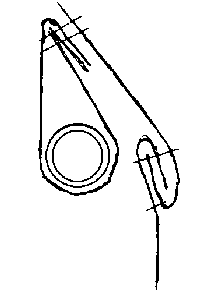
 if you're using a ring in your pavilion, you'll also need to sew a series of twelve pockets for it on the inside of the canopy, using the scrap you cut off the side walls (48" cloth people) or the canopy (60" cloth people). the pockets should be formed of a strip of cloth 27" long and six times as wide as the diameter of the ring material, plus an inch or so for folding over. (The gaps between the pockets are for access to the pipe connectors you'll need to join the ring together, attach the sidewalls via ties or hooks, attach guy ropes, and so on.) Sew the material for each pocket into a long tube and press it flat. Align the pocket so that it's centered on the canopy panel and its bottom (the side without the seam) lines up with the bottom of the valance/canopy seam you just sewed in the last paragraph. (See the figure at the right.) Then sew the top of the pocket to the canopy. Repeat with the other eleven pockets, and then close the twelfth and final seam of the canopy and valance.
Take some more of your scrap material and hand-sew at least two more layers of fabric to the upper foot of the canopy cone. This area gets a lot of strain from the center pole. Hand-sew an additional reinforcement of leather, webbing, etc. right at the apex, where the center pole will go, and further reinforce the hole with a large grommet, hand-sewn ring, or equivalent. Plan on making the center pole a little long, and cut it to size after the tent is finished. This is because its length depends greatly on the stretchiness of the fabric, the precision of your canopy seaming, and other variables.
To sew the sides, simply seam the panels together and make a 1" hem around the assembled panels. Put stake loops on the bottom and either ties or S-hooks at the top, to attach to the ring when you set the tent up. Attach your favorite closing system, and voila! You're done! I've left the selection of closures (ties, buttons, zippers, snaps, etc.) to you. It depends on how "period" you want to go, and how fast you want to get into (our out of) your pavilion.
With your left over-cloth, you can make stuff bags for your tent, along with a separate, heavy-duty (double-layer) bag for all your tent stakes.
If you're using conduit, the same things apply except that you'll want to pre-bend each tube into the radius formed by the canopy, because it won't bend as well as the plastic stuff. You could also put fifteen-degree bends at each canopy seam, leaving the rest straight. If you do this, you'll have to cut one leg of the angle very short at each place where a joint goes, so the joint won't end up inside the ring pocket.
For the center pole, please go with something a little stronger than your standard 2" x 2" dimensional lumber. Even with lightweight cloth, it won't be strong enough. Check your area's lumber sources to see if you can get a true 2" or 2-1/4" round pine or fir, or a true 1-3/4" or 2" round hardwood.
Cut the pole a little longer than twelve feet. You may find that your material stretches to the point that your tent is taller than the nominal twelve feet, and you really don't want to hem the sides on the bottom to shorten the tent to suit a center pole already irrevocably cut to size (although that remains an option, particularly if your tent stretches over time and you don't want to keep replacing center poles).
You'll want to attach guy ropes for the tent, even though you won't need them when it's not windy, because it will rarely be not windy. If you're using the ring construction described above, it would be better not to attach the ropes directly to the ring, because tighting the ropes asymmetrically could cause the ends of the segments to slip out of their corresponding joint sockets, resulting in much grief. Instead, attach the rope to the valence-canopy seam, either through grommets in the seam or via webbing loops sewn onto the seam at intervals.