The main choice is how many spokes you need, what diameter and what length they need to be, and how deep to make the sockets for the spokes. Most of the tents I've seen that are around ten to twelve feet at the eave use between eight and twelve spokes, and are fine with spokes about an inch and a quarter in diameter, which the dimension of the "closet round" stock available at your local building supply center. The more spokes you have, the smaller in diameter they can be, but one inch seems to be the minimum. (I've used 3/4" square oak for a twelve-spoke tent that was 10' at the eave, but that seemed to be the minimum I could get away from for that design.)
The advantage of the closet round is that it is cheap, widely available, and reasonable straight (especially if you hand-select them, or at least tell the stock person what you're using them for so she or he can pick out the best ones for you). You may well find that it is much cheaper than the smaller-diameter stock. My lumber yard also stocks them in sixteen-foot lengths, allowing me a more efficient cut (three five foot segments, or two seven-foot segments, per length).
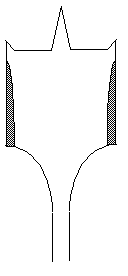
A mistake many people make when drilling the sockets is not making them deep enough. When the tent is set up, the spokes want to "rack" ... that is, the hub wants to twist so that the spokes no longer line up with the center pole:
Besides looking ugly, this situation also puts a lot of bending load on the spokes at the point where they enter the sockets, and stresses the sides of the holes in such a way that the fit becomes even looser.
There are two solutions, neither very practical. The first is to make the fit of the spokes as snug as possible, so that there is no "slop" in the socket. Although it minimizes the racking, it also may make the joint difficult to take apart, particularly in moist weather when the spoke and hub want to swell slightly.
The other solution is to make the spokes longer, and the sockets deeper. This allows you to use a larger diameter hole, and the depth of the sockets all but eliminates racking. The problem here isn't evident until setting up the tent, when you're ready to put in those last few spokes. You'll find it impossible to put them in without overtensioning the eave of the tent.
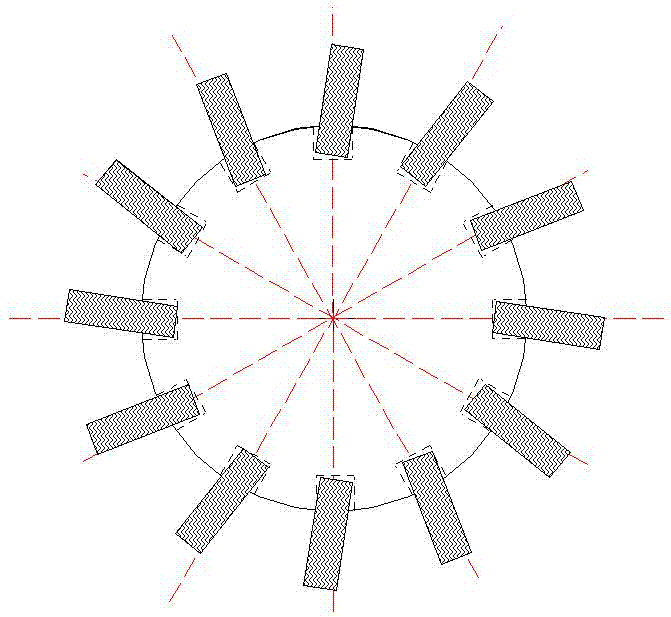
Fortunately, there is yet a third solution...make the spokes of different lengths, going into sockets of different depth
:
In the illustration above, the hub is a twelve-spoke tent, and every fourth spoke is an inch or so longer than its buddies. These three spokes go in first, and the sockets are marked so that the long spokes go into the deep holes. When these spokes have been installed, they hold the hub in the proper relationship so that all the other spokes will be correctly angled without racking.
Obviously, the fewer long spokes there are, the more bending stress those spokes will be under at the point where they enter the hub. In my eight-spoke rounds (octagons, actually), I've erred on the side of safety by making all the spoke holes two inches deep except for the very last one which is only about three-quarters of an inch deep.
It makes sense to err on the side of depth. If a spoke turns out to be too hard to insert, it's a relatively simple matter to saw a bit off the spoke and glue the cut-off piece into the socket. As long as that particular stake goes into that particular hole, everything is copacetic.
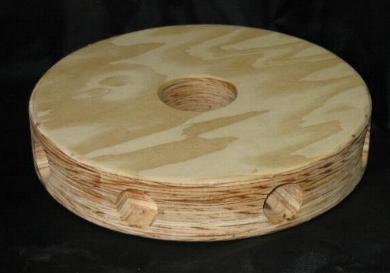
We make them by cutting the plywood into one-foot squares and gluing them together with Titebond II (a more water-resistent version of Titebond glue), which we've found to be quite adequate. If you're making a large hub under stress from long spokes, you might want to use an epoxy and/or fasten the sections together with screws.
The glued-up blank, now 2-1/4" thick, is then sawn into a circle with a bandsaw using a custom table guide to ensure true circularity. Then the sockets are bored on a drill press fitted with a Forstner bit, using another custom fixture so the hub can be rotated on a sort of turret. Finally, the center hole is bored, after which the edges of the hub on the inner perimeter and outer perimeter are rounded using a router table.
If you don't have a bandsaw and must use a jigsaw or saber saw, it would probably be easier to saw the pieces into circles and then saw the center-pole hole in each piece before gluing them together. If you have an extra piece of center-pole, use it to align the sections (or use the center pole itself, if you wish, although you certainly want to wax the section you use so any squeezed-out glue doesn't stick to it). After the glue dries, clean up the hole with a rasp.
Finally, drill the spoke sockets using a hand drill with a spade bit of the appropriate size (a size 1/8" larger than the spoke works well). A drill press really helps here, although you can do it with just a hand drill if you're careful not to lean the bit. If you have a grinder handy, you might want to take a wee bit off the sides of the spade bit, as shown in the illustration below (the shaded areas are what you want to grind away). This modification will help keep the sides of the bit from binding in the holes. Try to remove exactly the same amount from both sides of the bit, to keep it in balance.
Updated in May, 2022